Tasmota Telemetrie Clients MQTT infrastructure  |
HiveMQ MQTT
Im folgenden Beispiel zur MQTT Anbindung eines Tasmota Moduls wird zwar HiveMQ als MQTT Broker verwendet, im Grunde ist die Einbindung innerhalb Tasmota stets identisch. Grundlegend basiert die Tasmota MQTT Anbindung auf den typischen Parametern
Ferner gibt es weitere Optionen, beispielsweise im Bezug HiveMQ wird nur das MQTT Protokoll über TLS unterstützt. Dementsprechend muß die Tasmota Firmware über MQTT TLS verfügen, im Detail bei der Kompilierung die Option
aktiviert sein. Oftmals wird ein MQTT Broker fälschlicherweise auch als ein “Server mit einem Webinterface” beschrieben. Ein MQTT Broker ist lediglich als Vermittler zwischen einer Vielzahl verschiedener Teilnehmer zu verstehen. Das ganz basiert dabei auf einer einfachen Grundlage es wird
stets basierend auf Topics / Themen. Übersetzt man nun die Topics auf Tasmota Module in Kombination mit typischer Infrastruktur, PC, Tablet, Mobiltelefon entspricht jedwede Hardware einem MQTT Client. Jeder MQTT Client meldet sich über die jeweilige URL / IP Adresse typischerweise über einen Benutzrnamen sowie Passwort beim MQTT Broker an. Nach erfolgreicher Authentifizierung wird em MQTT Broker mitgeteilt welche Topics man abonnieren, bzw. in welche Topics publiziert werden soll. Basierend auf diesen Grundlagen erfüllt der MQTT Server seine Funktion als Broker, Daten gezielt durchzureichen. |
HiveMQ MQTT
In the following example of the Tasmota Module MQTT connection HiveMQ is used as the MQTT broker, but the integration within Tasmota is basically always identical. The Tasmota MQTT connection is fundamentally based on the typical parameters
There are also other options, for example with HiveMQ only the MQTT protocol over TLS is supported. Accordingly, the Tasmota firmware must have MQTT TLS, in detail the option during compilation
be activated. An MQTT broker is often incorrectly described as a “server with a web interface”. An MQTT broker is simply to be understood as an intermediary between a large number of different participants. This is all based on a simple basis
always based on topics. If you now translate the topics to Tasmota modules in combination with typical infrastructure, PC, tablet, mobile phone, … any hardware corresponds as a MQTT client. Each MQTT client logs in to the MQTT broker via the respective URL / IP address, typically using a user name and password. After successful authentication, the MQTT broker is informed which topics subscribe to and/or which topics should be published in. Based on these basics, the MQTT server fulfills its function as a broker to pass data through in a targeted manner. |
HiveMQ MQTT Broker Cluster setup  |
MQTT Broker einrichten
Die Einrichtung eines MQTT Brokers unter HiveMQ ist denkbar einfach. Zunächst, insofern man noch nicht über ein HiveMQ Benutzerkonto verfügt muss man sich hier entsprechend registrieren, bzw. anmelden. Nachdem man sich registriert und angemeldet hat wird man direkt auf die Cluster Verwaltung geleitet, hier lediglich den Button CREATE NEW CLUSTER klicken. Es erscheint die Übersicht der verfügbaren Cluster Pakete, hier das Paket Serverless FREE durch klick auf Get Started auswählen. Es erscheint das MQTT Cluster Management wichtig ist hier der Eintrag Cluster URL, das ist die zu verwendende Server URL / MQTT IP Adresse. Nun wird noch ein MQTT Benutzer sowie Passwort benötigt hierzu ganz oben im Menü von OVERVIEW auf ACCESS MANAGEMENT wechseln. Im Access Management nun einen Username sowie Password festlegen und im DropDown Permission Publish and Subscribe auswählen. Selbstredend sollte man sich Benutzername und Passwort zur weiteren Verwendung entsprechend kopieren / als Text ablegen. Die Benutzerdaten durch klicken auf CREATE CREDENTIAL bestätigen, in der Benutzerübersicht erscheint nun der oben festgelegte MQTT Benutzer. Das war auch schon alles, der MQTT Broker ist aktiv sodass entsprechende Clients angebunden werden können. |
MQTT Broker Setup
Setting up an MQTT broker under HiveMQ is easy. First of all, if you do not yet have a HiveMQ user account, you must register or log in here. After you have registered and logged in you will be taken directly to the cluster administration, just click the CREATE NEW CLUSTER button. The overview of the available cluster packages appears, select the Serverless FREE package by clicking on Get Started. The MQTT Cluster Management appears. The Cluster URL entry appears, which is the server URL / MQTT IP address to be used. Now you need an MQTT user and password to switch from OVERVIEW to ACCESS MANAGEMENT at the top menu. Now set a username and password in Access Management and select Publish and Subscribe from the Permission drop-down. Of course, you should copy your username and password for further use / save them as text. Confirm the user data by clicking on CREATE CREDENTIAL; the MQTT user specified above will now appear in the user overview. That’s all, the MQTT broker is active so that corresponding clients can be connected. |
MQTT Explorer Setup HiveMQ MQTT Broker connection  |
MQTT Explorer
Wie im Vorfeld erwähnt dient der MQTT Broker lediglich als Vermittler zwischen MQTT Clients. Hier im Beispiel wird nun der MQTT Explorer als MQTT Client verwendet. Der MQTT Explorer ist hier für jedes gängige Desktop Betriebssystem verfügbar. Nach erfolgreicher Installation müssen lediglich die erforderlichen Parameter, basierend auf dem HiveMQ MQTT Broker eingepflegt wie folgt eingepflegt werden:
Der erste MQTT Client ist nun mit dem MQTT Broker verbunden. An dieser Stelle sei erwähnt beim MQTT Explorer ist der Name Programm, es werden sämtliche MQTT Client – Verbindungen sowie damit verbundene Topics angezeigt. |
MQTT Explorer
As mentioned before, the MQTT broker only serves as an intermediary between MQTT clients. Here in the example the MQTT Explorer is now used as the first MQTT client. The MQTT Explorer is available here for every common desktop operating system. After successful installation, all you need to do is enter the required parameters based on the HiveMQ MQTT Broker as follows:
The first MQTT client is now connected to the MQTT broker. At this point it should be mentioned that the name of the MQTT Explorer says it all; all MQTT client connections and associated topics are displayed. |
Tasmota HiveMQ MQTT Broker configuration  Tasmota MQTT first start Tasmota MQTT first start  |
Tasmota MQTT Konfiguration
Im Vorfeld sei erwähnt, die Tasmota Firmware muß MQTT TLS unterstützen, andernfalls erfolgt keine Anmeldung am HiveMQ MQTT Broker. Die Anbindung eines Tasmota Moduls an einen HiveMQ MQTT Broker erfolgt gleichermassen basierend auf den typischen MQTT Parametern unter Verwendung des Tasmota Webinterface:
Das Tasmota Modul führt nun einen Neustart aus und verbindet sich mit dem HiveMQ MQTT Broker. Wechselt man in den MQTT Explorer sieht man bereits die Topic tele/tasmota_??????/LWT. |
Tasmota MQTT configuration
It should be mentioned in advance that the Tasmota firmware must support MQTT TLS, otherwise there will be no connection established to the HiveMQ MQTT broker. The connection of a Tasmota module to a HiveMQ MQTT broker is based on the typical MQTT parameters by using the Tasmota web interface:
The Tasmota module now restarts and connects to the HiveMQ MQTT broker. If you switch to the MQTT Explorer you can already see the topic tele/tasmota__??????/LWT |
Tasmota send RS232 to MQTT  Tasmota publish data to MQTT Tasmota publish data to MQTT  |
Tasmota MQTT publish
Zwar verwendet man Tasmota häufig in Kombination mit Sensoren, hier im Beispiel wurde jedoch gezielt ein EI-OT RS232 WLan Bridge Modul verwendet. Typische Tasmota Sensor Module interagieren meist nur in eine Richtung, es werden Sensordaten publiziert. Der Ablauf ist denkbar einfach gemäß vorgegebenen Intervall erfasst das Tasmota Modul Sensordaten und publiziert diese Daten über die Topic tele und Benennung seiner Modul ID also Topic tele/tasmota_?????/sensors Übersetzt auf das Tasmota RS232 Modul erzeugen wir nun die Daten indem wir serielle Daten auf den DB9 Anschluss des RS232 Moduls senden (siehe im nebenstehenden Bild Terminal Texteingabe send a string from ….) Sobald die Taste ENTER im Terminal gedrückt wird (siehe unteres Bild), werden die Daten (der String)
Betrachtet man sich nun den MQTT Explorer so erkennt man nun eine neue Topic tele/tasmota_?????/RESULT und sieht dort den String der zuvor über den den seriellen Terminal an das Rs232 Modul / Tasmota gesendet wurde. Der String wurde im Detail nachdem er empfangen wurde / in der Tasmota Console erschien
durchgereicht, es wurde unter der Topic tele/tasmota_?????/RESULT publiziert. |
Tasmota MQTT publish
Although Tasmota is often used in combination with sensors. In this example an EI-OT RS232 WiFi bridge module was specifically used. Typical Tasmota sensor modules usually only interact in one direction and sensor data is published. The process is very simple, according to the specified interval, the Tasmota module collects sensor data and publishes this data via the topic tele and naming its module ID, i.e. topic tele/tasmota_?????/sensors Translated to the Tasmota RS232 module, we now generate the data by sending serial data to the DB9 connection of the RS232 module (see terminal text input send a string from …. top image). As soon as the ENTER key is pressed in the terminal (see image below), the data (the string)
If you take a look at the MQTT Explorer you will now see a new topic tele/tasmota_?????/RESULT including the string that was previously sent via the serial terminal to the RS232 module / Tasmota. The string was after it was received/appeared in the Tasmota Console
it was published under the topic tele/tasmota_?????/RESULT. |
MQTT send a string thru Tasmota to serial Terminal  Serial Terminal receives RS232 Signal thru Tasmota over MQTT Serial Terminal receives RS232 Signal thru Tasmota over MQTT 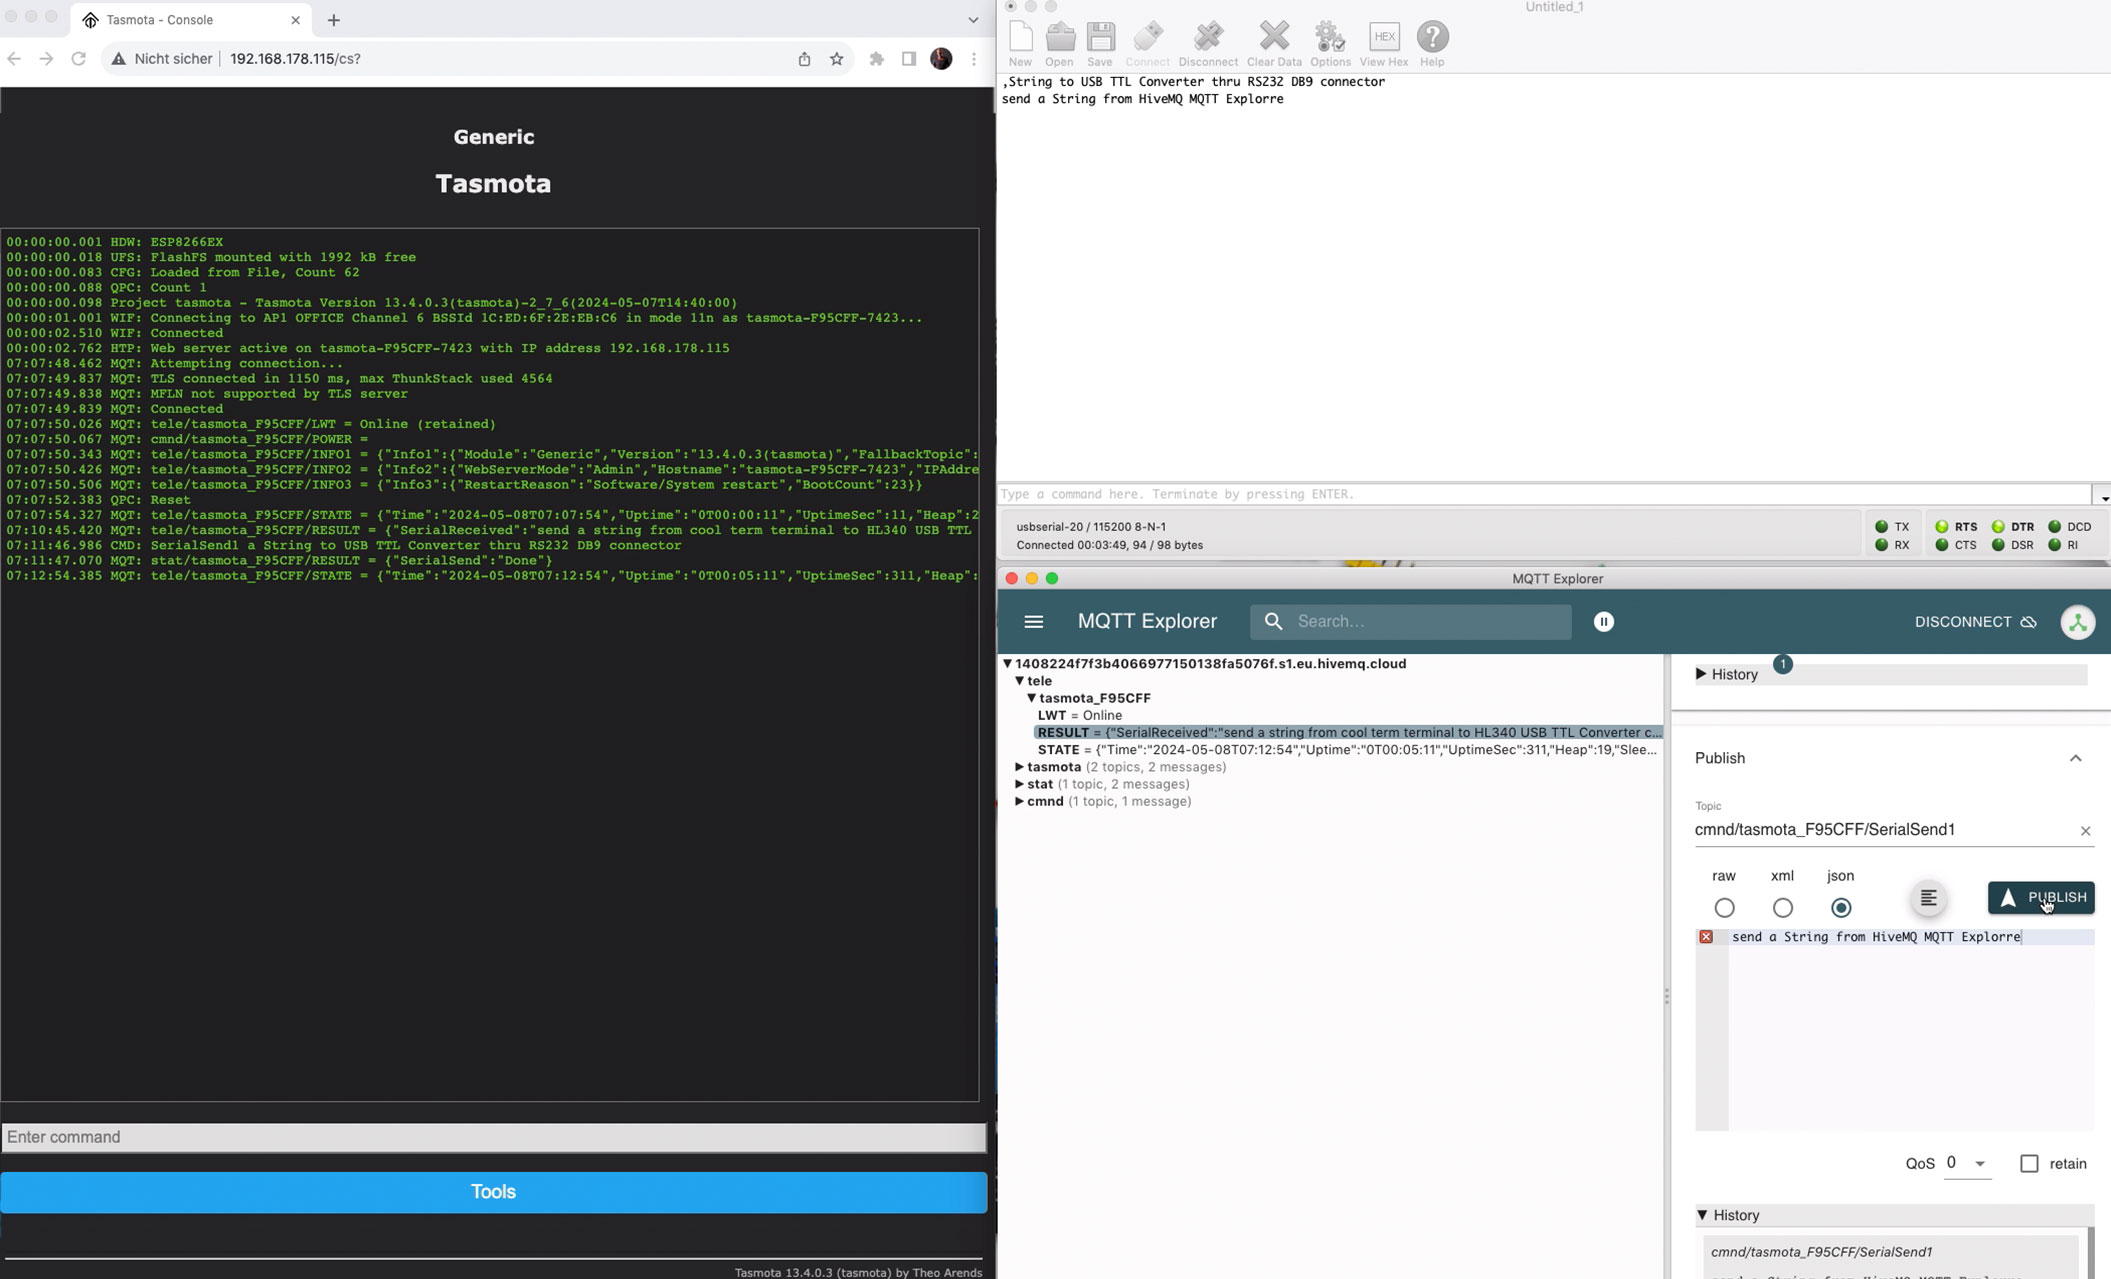 |
Tasmota MQTT subscribe
Im Eigentlichen basiert das MQTT Prinzip nunmal auf Publizieren und Abonnieren. In Anlehnung an das obige Beispiel müsste nun zunächst das Tasmota Modul eine MQTT Topic abonnieren um etwas zu empfangen. Das Abonnieren einer Topic ist bereits mit der MQTT Konfiguration innerhalb der Tasmota Firmware erfolgt, bzw. im Detail handelt es sich um die Topic cmnd innerhalb von Tasmota. Im Detail werden sämtliche in diese Topic gesendeten Daten als Tasmota Commands abgearbeitet. cmnd/tasmota_?????/ Wechselt man nun in den MQTT Explorer, scrollt im rechten Bereich nach unten bis der Reiter Publish erscheint kann man direkt in MQTT publizieren. Im Detail cmnd/tasmota_?????/ gefolgt vom Tasmota Command, in unserem Beispiel SerialSend1 um einen String
Sobald der Button Publish im MQTT Explorer geklickt wird (siehe unteres Bild), werden die Daten (der String)
Aus Sicht des MQTT Explorer wurde publiziert, aus Sicht des Tasmota Moduls wurde abonniert. |
Tasmota MQTT subscribe
Actually, the MQTT principle is based on publishing and subscribing. Based on the example above, the Tasmota module would first have to subscribe to an MQTT topic in order to receive something. Subscribing to a topic has already been done with the MQTT configuration within the Tasmota firmware, or in detail it is the topic cmnd within Tasmota. In detail, all data sent to this topic is processed as Tasmota commands. cmnd/tasmota_?????/ If you now switch to the MQTT Explorer, scroll down in the right area until the Publish tab appears, you can publish directly in MQTT. In detail cmnd/tasmota_?????/ followed by the Tasmota Command, in our example SerialSend1 by a string
As soon as the Publish button is clicked in the MQTT Explorer (see image below), the data (the string)
From the MQTT Explorer perspective it was published, from the Tasmota module perspective it was subscribed. |